Natural Beauty Tip — Fade stretch marks away with egg white

Stretch marks are those whitish-bluish lines on our skin which often are a result of sudden growth, weight loss or stretching of the skin. Most people have stretch marks on their body, especially around the buttocks, arms and thigh area. After pregnancy, many women also have these marks around their belly region. Though you cannot completely do away with stretch marks, one way to lighten them is by applying egg white.

Egg white helps in fading away those ugly lines as it is rich in protein. Our skin too is made up of protein and when nourished with it, it goes back to its healthy state. Here’s how to use it.

  • Steps:
    Get the white of two eggs (you can take more depending on the areas you wish to apply it on).
    Whip them properly to get a thick paste.
    Now apply it on the stretch marks, make sure it is a thick layer.
    Leave it to dry.
    Later, wash the area with lukewarm water.
    You need to keep the area well-moisturised, so apply olive oil or a good moisturiser.
    Use this paste once a week to see visible results.

Remember, your skin takes time to heal, so do not discontinue it after a week or two. You will start seeing results within a month for sure. If you are not too fond of using egg whites, here are some more home remedies to fade them away. You may also like to read a few myths about stretch marks and these cosmetic options to treat them.

Source: The health site


Natural Remedy to remove Skin Tags

Natural Remedy to remove Skin Tags

The scientific name of skin tags is achrochordon, the other names of skin tags are cutaneous papilloma or cutaneous tag, fibro epithelial polyp, fibroma molluscum or fibroma pendulum, papilloma colli, soft fibroma, and Templeton skin tag, and these are benign, non-cancerous skin growths that look like a small piece of soft, hanging skin. However this growth is harmless.

These skin tags can be seen on any part of the body, generally caused in the places where there is rapid rubbing of skin with skin, some common places where skin tags generally occur are Eyelids, Axillae (armpits), Lower portion of breasts, Groin, Upper chest portion and neck. Their appearance is different, commonly irregular in shape, brownish fleshy color hanging from the skin. The size varies from 2.5mm diameter to larger size, sometimes they may grow up to size of a grape approximately 5cm diameter. They are composed of nerve cells, fat cells, core of ducts and fibers, covered with epidermis.

Skin tags are commonly caused in the people who are suffering from obesity or overweight, diabetes and women who are pregnant. Sometimes heredity will also be a reason for skin tags. These skin tags equally affect males and females.

Causes of skin tags:
These skin tags commonly affect middle age people. Bunches of collagen and blood vessels that are trapped inside thicker bits of skin are responsible for the cause of skin tags.

When skin is rubbed with skin, which generally occurs in places of body like folds, armpits etc, there are chances of skin tags to appear.

Increasing the likelihood of developing a condition or disease is called a risk factor. Probably more skin folds and creases happen in the people who are obsessed and of overweight which causes achrochordon. Hormones that are secreted in the pregnant women are also a cause for skin tags. People suffering with diabetes are also susceptible to skin tags. Usage of steroids causes the collagen fibers in the skin to bond which forms skin tags on the body skin.

A study in the National Institutes of health, USA proves that nearby 46 percent people are suffering from skin tags, which is mostly due to heredity

Skin Tags Symptoms:
The most common symptom of skin tags is skin growth. The growth is generally very small in diameter, sometimes it may vary up to 5cm in diameter in a worst case.

Skin tag sometimes have a narrow stalk (peduncle), commonly occurred in folds and creases, like armpits, lower portion of breasts in women, upper chest part, groins etc. They are smooth to appear, fleshy brownish in color and irregular shape. They mostly form in groups on the skin which can be stuck when shaving, rubbed by a cloth or by jewelry.

The article further throws you useful information on the home remedies to remove skin tags. Various surveys and researches have shown skin tags as genial and vary in cases which are non-threatening which can be removed or treated being seated back home.

Before applying these it is always advised to check for the skin tendency in terms of the color changes that the tags are growing. In case they appear mild then the suggestible treatments would be:

Though painful, trying a duct tape or hail polish over a skin tag is a good treatment. Some of the herbal treatments for skin tags, the advantage of it is they are less invasive and disadvantage is that they take a little more time for them to work.

Tea Trea Oil
Tea tree oil helps you control and cure many skin disorders, including skin tags and moles. In order to use this sure, firstly clean the skin tag and take a cotton ball soaked in water, add 3 drops of tea tree oil to the soaked cotton ball now apply it directly to the skin tag in circular motions. Repeat this 1-2 times daily for a week or 10 days until the lesion vanishes.

Castor Oil
Castor oil can be used both internally and externally. It can be used as an external ointment by mixing it with a little baking soda to create a paste. You can also add some citrus oil to the paste as it will be very stinky. Apply this paste on the affected area and use a band aid to cover it. Repeat this for 2 – 4 weeks or until the skin tag disappears.

Apple Cider Vinegar
Apple cider vinegar is very effective in removing skin tags. Apply a small dab of vinegar on cotton ball or a q-tip and apply it on the skin tag. After application, it causes a stinging sensation for a few minutes. Use it for two to four weeks for the skin tags to vanish

Lemon Juice
Lemon juice contains citric acid, which helps you in decomposing off the cells in the skin tags. Dab some lemon juice onto a cotton ball and apply it directly on the skin tag. Leave it on the affected area till it dries. You will notice some changes in the skin tags after a applying it for few days and in due course the skin tag will dry out and vanish.

Banana Peel
Banana peel is a good remedy for skin tags. To use it cut the banana peel into small pieces. Put the peel on the affected area and hold it securely with a bandage. Take care that the inside of the peel comes in contact with the affected skin area. Let it rest overnight and repeat this process daily until the skin tag falls off.

Dental Floss
Another method to get rid of skin tags. It can be used on any body part. In order to use this dental floss, tie a knot tightly around the base of the skin tag close to your body. After a period of 2 – 3 weeks the skin tags will become smaller and will disappear in due course. This helps in killing the skin tag by blocking blood flow temporarily to the affected area.

Onion Juice
Slice onion into small pieces and soak it in a container with salt overnight. Now extract juice from this soaked mixture. In the evening, apply this onion juice on the affected area or skin tag and cover it. Leave it overnight and rinse if off in the morning with warm water. Continue this process every night for a week.

Pineapple Juice
Pineapple is a good remedy to get rid of skin tags. Apply the pineapple juice on the affected area for twice or thrice each day for 7 to 10 days without rinsing it off, this makes the skin tag to fade away.

Garlic
Apply some crushed garlic juice onto the affected area and cover it with a band. Take care that you change the band and the garlic juice at least thrice a day.

Aloe Vera Gel
Aloevera is good for any skin condition. Massage it onto your skin daily. Apply the aloevera juice directly on the skin tag. Because of its ability to health any kind of skin disorders so it is used as a main in gradient in many skin care products

Compressed Air
In cryotherapy, the lesion is frozen off. Compressed air in a tin also has a same effect as that of cryotherapy. After 1 – 2 applications of compressed air the skin tag will change its color and will fade off eventually.
This method has downside too, as it may result in freezing. This damages the surrounding tissues and results in the breakage of the cells.

Nail Polish
Cover the lesion completely with nail polish and leave it on until it gets dry. Repeating the same procedure for 2 – 3 times using fresh paint daily will make the tag fade off in due course.

Duct Tape
Duct tape applied on the skin tag for 7 days will help the skin tag to drop off while removing the tape. This method is usually used in mole removal, and is an effective natural home remedy for removal of warts.

Vitamin E
A best treatment for removing skin tags. You need to rub the vitamin on to the lesion two times a day. This will help you remove the skin tags in 1 – 2 weeks. Combine vitamin E with garlic and let it rest overnight for better results.

Ginger
Rub slices of raw ginger on the affected area for around 2 weeks and the skin tag is supposed to fall off eventually.

Fenugreek Seeds
Fenugreek is an amazing herb that contains powerful antioxidants. The efficacy of fenugreek seeds helps in skin tag removal. Soak fenugreek seeds overnight in water and drink this water in the morning before having breakfast. Or even you can chew soaked seeds. This herb also helps you in avoiding anemia or thyroid conditions, but do not consume more than 100 g each day.

Nail Clippers
You can remove skin tags with scissors or nail clippers, but it may cause bleeding and infection, so sterilize the clippers and surrounding area of the skin tag with isopropyl. Now make the skin numb with an ice cube. Pull the skin tag away and cut it with clippers.

Now press it firmly with a sterilized gauze pad until bleeding ceases. Once the bleeding stops, apply an antibiotic.

These are some of the herbal treatments, which help you in getting rid of skin tags. Have patience for a couple of weeks so that you can naturally treat the skin tags with simple home remedies.

Source: health digezt


5 Things you should know before getting a facial

5 THINGS YOU SHOULD KNOW BEFORE GETTING A FACIAL

1- Determine what your there for before you go: relaxation or treatment
Just like a massage, there are varying types of facials- some that are geared towards pampering and relaxation, and some that are geared towards treatment of specific skin issues. Knowing ahead of time what your goals are for the experience will ensure that you get the best results, and that your skin therapist heads sown the right path. Relaxation treatments typically consist of a thorough cleansing, minor exfoliation, steamy hot towels, and luxurious masques. While treatment facials are comprised of stronger exfoliators that may sting or tingle, extractions of pimples and blackheads, and the use of agents that may cause peeling (the good kind of peeling that means new shiny skin is on the way!)

2- Don’t book your facial on the eve of a big event

Facials often leave your skin a little red, especially if pimple extractions took place. [they are my favorite part… weird right?] Give yourself plenty of time to recover from any redness or peeling that may occur in the couple of days following your treatment. It’s always better to be safe than sorry, so I recommend about 3-4 days after your facial for anything major such as a wedding or event. Your skin will still be glowy!

3- Speaking of GLOWY- shiny has a whole new meaning!
Post facial, you’ll be squeaky clean like you’ve never been before! After several cleansings, hot towels, steam, and luxurious products- your skin will be completely free of any dirt, buildup or makeup. This means that when you walk out of the spa and back into the dressing room, you may not recognize yourself when you pass by a mirror. It’s ok- many of the other spa patrons will be in your same boat. And while it is tempting to quickly apply your makeup to feel human again- I suggest you refrain as long as possible to give your skin a chance to really breathe, free from all that gunk. This means yes, you’ll have to walk to your car with a bare face, and yes, your husband may look at you a little sideways- but if you can handle it… 12 hours sans makeup will do your skin some serious good!

4- A facial isn’t just for the face
While the vast majority of the treatment concentrates on the face, the rest of your body gets some good vibes too! The facial includes work on the neck and upper chest area, called the decollate. It’s all part of the body that needs to be cared for to help prevent aging, and to protect against the suns UV rays. So your therapist will continue the use of the steamy towels, masques, and lotions down on to your chest as part of the whole regimen. Beyond that your therapist will also offer a nice massage to the hands, head, shoulders or feet- usually while the treatment masques are working their magic on your face. It’s incredibly relaxing and all around good for the body and soul.

5- The benefits of a facial go well beyond a clean face
Not only does your facial treat the skin, it also treats the systems in the body that provide nourishment to the skin and its cells. While I was earning my esthetics license, I became interested in the lymphatic system and its role in the bodies health. The lymph system resides just under the surface of the skin and can be triggered to carry toxins out of the body with touch. Facial, neck and chest massage trigger movement in the lymph system that in turn, increases blood flow, circulation, and healthy cell turn over. All of which have huge benefits for your over all health and appearance. Pretty amazing, right!?!

So, if your lacking some luster in your skin, struggling with fine lines or acne, or just need an hour away for some ‘me-time’- I highly recommend you book yourself a facial. You won’t regret it! Be sure you come back next week to learn about my at-home facial routine too.

Source: Beauty snoop


Timeless beauty tips to follow

32413232

Cleansing twice a day, getting good sleep and drinking water are some of the beauty tips that stand the test of time.

  • Cleanse regularly two times per day and use a SPF.
  • Use the best cosmeceutical products you can afford.
  • Good sleep is vital to any beauty regime.
  • Inflammation and dehydration accelerate ageing – so always use an antioxidant to fight free radicals first before you apply your moisturiser and sun block.
  • Drink one and a half litres of water a day.
  • Walk briskly for 30 minutes every day – yoga and Pilates are good too.
  • Keep your mind focused and energised by reading up on your favourite topics or authors.

Source: Times of India


Simple Beauty tips that work

beauty-tips

Use toothpaste on yellow nails.
This usually happens when you let nail polish stay on your nails for very long and when you’ve used cheap nail polish. Whiten them all up by rubbing toothpaste to remove the stains. You can also add a few drops of lemon for extra whitening, it’s a natural bleaching agent.

Use suntan oil to treat damaged hair.
Here’s another use for that coconut suntan oil you love so much. If your tresses have been damaged from over styling or coloring, you can use this oil to treat it. Rinse your hair with warm water and then with a dollop of suntan oil, rub this on your hair. Wrap it in plastic cling wrap and secure with a towel. Sleep with this on overnight. The next day, wash your hair with baby shampoo (or anything moisturizing) to get the greasiness out.

Protect skin from the pool and the beach.
Don’t you hate the chlorine smell after swimming in the pool and the sticky feel of sea salt on your hair and skin after a dip in the beach? You can help minimize these effects by showering first with non-chlorinated water, which fills your pores and hair follicles. By doing this your hair won’t soak up much more water and then the residues will be easy to shower off.

Treat burns with milk.
If you’re burnt badly, first aid treatment could be standing under the shower and pouring canned milk over the burns. It will help pull the heat from the burn until you can get medical treatment.

Hydrate before travelling.
Since when you’re in a plane, you’re much closer to the sun, the proximity lets you be exposed more to the solar rays. Avoid drinking alcohol and salty foods because they are dehydrating. Drink lots of water instead, this will help your skin a lot.

Powder Your Roots
If by any chance you have no chance to jump into the shower and you need to look your best. Say for example you’ve spend the whole night preparing for an important presentation. Get a fluffy makeup brush and dab it onto loose powder and then brush it on the roots of your hair. Shake off the excess. The powder will soak off the grease in your locks.

Cure Calluses with Vaseline or petroleum jelly
It’s very unsightly to see hard calluses on your feet especially when you’ve been wearing closed shoes for a long time. I’ve seen a friend do this. To soften these tough calluses, she puts on petroleum jelly on them and puts on socks before going to bed.

Spot-Treat Smudges
I find cotton tips very usual for this. You can use it on your eyelids if you’ve made a mistake with your eyeliner and for your nails to correct a stray nail polish line.

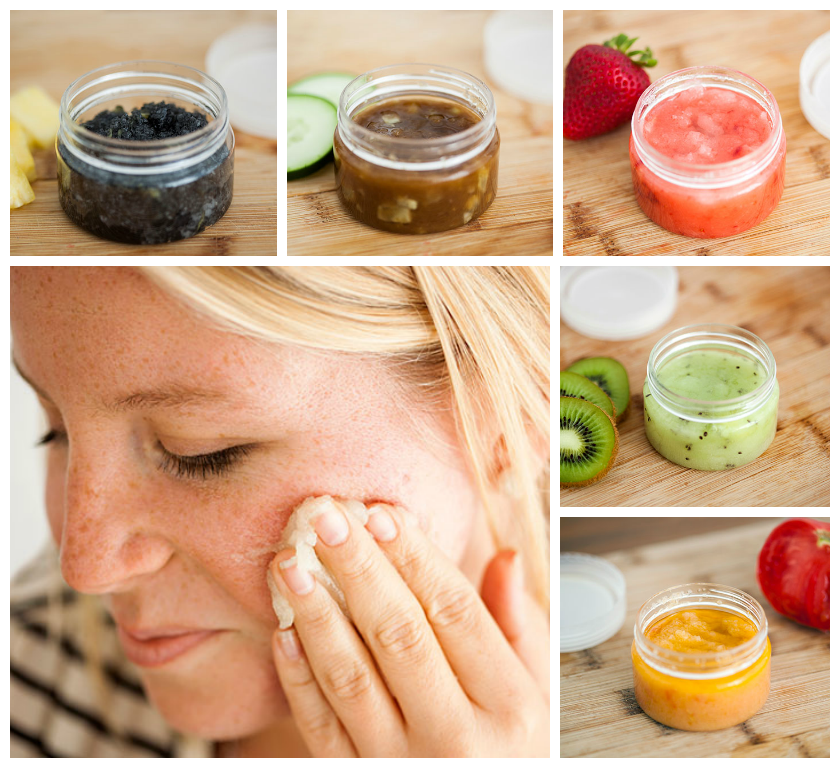
Soften Your Body with an Avocado
Since avocadoes are natural moisturizers. Mash one up and slather this on your body just before taking a shower. The body mask will do wonders for your skin.

uper-Glue a Nail
Yikes! Accidents sometimes happen and when one of your nails break, you can choose to Super Glue it for the meantime. Add an opaque nail polish to cover the crack. Then when you get the chance to, better to cut it off.

Use Makeup Remover on Stubborn Lipstick
Instead of rubbing vigorously on your lips to remove red or dark lipstick, just dab on a cotton ball with makeup remover instead. This will help your lips from getting chapped and bruised.

Tame Brows with Eye Cream
Don’t you just hate it when there appears unsightly white specks on your brows that look like dandruff? This means they’re a bit dry, keep them hydrated with rich eye cream.

Use brown sugar to treat dandruff
If you’ve tried all the dandruff shampoos that you can buy and still your dandruff persists, try out this homemade treatment instead. Mix two parts of brown sugar with one part conditioner and then use this on your scalp. Leave on for about 3 minutes and then rinse it off.

Buff with Baking Soda
I’ve laughed at that episode in Friends when Ross went to a self-tanning sauna and got disastrous results. If you find yourself streaking (not glowing) after applying self-tanner (not all of us become experts at the first try), scrub away the unsightly spots with a loofah doused with baking soda.

Brush on Hair Spray
What I hate about hair sprays is that your hair becomes so stiff and the overall look doesn’t look natural anymore. For a neat hair trick, spray the hair spray on your hair brush after blow drying it. This way, you’ll still get the effects of the hair spray without making your hair look very stiff.

Boost Body Lotion with Baby Oil
For that shiny leg effect but don’t have any bronzing lotion with you, mix in a little baby oil into your everyday lotion to get the same effect.

Dab Body Oil on a Hangnail
Put on apricot oil, the kind found in health-food stores, to protect cuticles from turning rough and raggedy.

For younger hands, rub lemon and salt
Remove dead skin cells by rubbing lemon juice and sea salt on your hands with the aid of a toothbrush.

Freeze Your Eyeliner
I love eyeliners because they perk your eyes right back up. However sometimes they get too soft to be applied. A quick remedy for this will be to stick this into a freezer for 15 minutes.

Use Toothpaste on a Zit
Use just a pea-size amount. Let sit for 15 minutes to absorb the oil so the pimple won’t get more clogged, then wash off. Additional tip from Heyhaie: Don’t use any toothpaste that whitens, the bleach will cause the zit to redden.

Heat Up Your Curler
If you have stick-straight lashes, try blasting your metal eyelash curler with a hair dryer for a couple seconds to heat it up so your lashes bend more easily. And use a waterproof mascara. The formula dries faster than other mascaras, so it sets the curl more effectively.

Use Soap Without Water
You know those fancy bars that are actually too pretty to use? Toss them in your underwear or tee-shirt drawers to make your skin smell delicious. You may also use fabric softener in packets.

Lubricate Your Lashes
An easy way to draw attention to your eyes without putting on a pile of makeup is to comb petroleum jelly lightly through the tips of eyelashes to get a sexy, subtle sparkle. It might feel icky if you put on a lot, so watch how much you’ll rub in.

Steamroll Flyaways
Spray on hair spray, then roll the can over your strands. The round bottle fits the curved shape of your head, locks in the spray, and flattens out frizz. You can also use a bit of lotion to further tame the flyaway.

Air-Dry Your Curls
Let your hair dry indoors before going out in the cold. Sometimes my curls look best when dried naturally instead of using a blow drier. It’s friendlier to your tresses too.

Press a Tea Bag on Splotches
If your skin is sensitive or just looking irritated and puffy for some reason, steep a bag of green tea for a minute or two, let it cool down, and dab it over your face. The antioxidants in the tea take down inflammation.

Shave with Conditioner
If you’ve ran out of shaving cream, you can use conditioner instead. Yep don’t use that body wash, the moisturizer in the conditioner will help prevent razor burns and will keep your skin smooth.

Amp Shine with Vinegar
Mix one part vinegar with four parts carbonated water, and soak dry hair. Leave on for 15 minutes before you shampoo to lock in shine and combat dullness.

Exfoliate Your Pits
If your underarms start to look dry and flaky, an easy trick is to exfoliate them with a gentle face scrub to keep that skin pretty when going sleeveless.

Customize Your Body Lotion
Instead of shelling out for an expensive perfumed body product, you can make your own by pouring a few drops of fragrance into any scent-free lotion. Rub it on-the scent will last for hours.

“Brush” with Mouthwash
If you’re too wiped out after a late night of partying to clean your teeth, rinse with water and mouthwash, then use a dry toothbrush on the area where your teeth hit your gums.

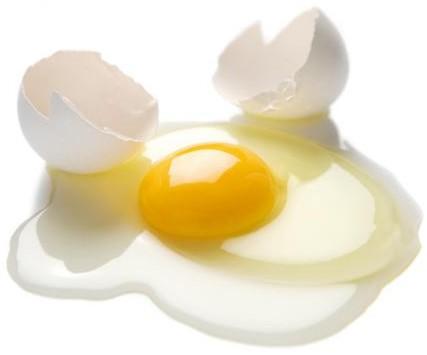
Use egg-whites for eyebags
The egg whites will tighten the skin right up. Let the egg whites dry before putting on make-up.

Make an Egg-White Mask
To revive tired, dull skin without hitting the spa table, try this: Crack open an egg in a bowl, separate the yolk, and use the egg whites to make a face mask. The proteins help to heal and restore skin’s moisture. Leave it on for five minutes, and rinse off. A note though, since egg whites tighten the skin and egg yolks moisturize, best not to use the egg white mask on a dry skin.

Source: Cher Cabula’s Mindbox


5 Facial scrubs you can make in your kitchen!

Beauty may be in the eyes of the beholder but it weighs heavy on the pocket! Given that cosmetic store shelves are lined with pricey products, one often wonders if basic skincare is on its way to becoming a privilege of the elite. Apart from the hefty price tag, one can never really be sure if the ingredients in the products won’t react on your skin.

The solution is simple, opt for homemade beauty products! Why bother buying when you can whip up everything from scrubs, creams to packs using stuff readily available in your kitchen cabinet.

Before we begin, it’s important to remember that exfoliation is a must-do in your beauty regime. Scrubbing helps achieve a smoother, even-toned complexion, making it radiant because we are sloughing off dead skin from our faces and making way for the production of new live, tissue. Use these homemade scrubs according to your skin type on a weekly basis to put your fresh face forward!

Chickpea and Rice

Yeah! You heard right, our humble dal and chawal can make for some awesome homemade scrubs. Rice is rich in Vitamin B complex so capitalize on the benefits by making a scrub of rice flour mixed with curd. The fine granules of rice flour remove dead skin with ease and curd enriches the skin with Vitamin C. Chickpea powder mixed with half a tablespoon of turmeric powder, a couple of rose water drops and milk is another nourishing scrub.

Oatmeal

Scrub made from oatmeal is perfect to give sensitive skin a stunning glow. You can use it with a teaspoon of water, or add it to a little warm milk for dry skin. If you are game for something a little more complex, mix 1 cup oatmeal with 1 tbsp brown sugar, 1 teaspoon sweet almond oil, 2 tbsp regular milk and the whites of one egg till it’s of spreadable consistency. Scrub in circular motions and rinse with lukewarm water for a gorgeous moisturized complexion.

Strawberry

This is one yummy scrub you will be tempted to put in your mouth rather than on your face! The mashed granules of strawberries are great for exfoliation. Start by de-stemming the strawberries and chopping them into small pieces and then mashing up the fruit to a pulp. Mix this with 1 tablespoon of milk and some oatmeal powder to get a thick consistency. You can also swap milk with honey, lemon juice or your favourite essential oil to get a healthy glow.

Salt & Lime

These two ingredients create an excellent homemade exfoliator for oily skin! This is a wonderful combination for an incredibly soft smooth skin. The lemon juice will get rid of the oil while the salt will slough off any unwanted dead skin. Try it, ladies, it really works wonders!

Coffee

A coffee scrub works as an excellent defense against facial cellulite, thanks to the overabundance of antioxidents it contains. Mix the coffee with 1/2 cup baking cocoa, 1/4 cup coconut oil and 1/4 cup honey to create a paste and apply to the face. Ground the beans or opt for the lot used to make filter coffee for maximum effect.
Remember, exfoliation should be done gently with a light touch to avoid injury to your skin!

Source: the med guru


Hair rebonding, smoothening or keratin treatment: which one suits you?

According to Adhuna Bhabani Akhtar, celebrity hairstylist, there are three basic ways to chemically straighten hair – by rebonding, smoothening or by keratin treatment, depending on how straight the hair is required to be. Find out which one is best-suited for your hair.

Keratin treatment

According to Rod Anker, Creative Director of Monsoon Salon and Spa, keratin treatment relaxes the curls and frizziness of the hair – making it only appear to be straight. It not only promises to make your hair smooth, shiny and frizz-free, it also makes it straight but not in an unnatural-looking, poker-straight strands. It softens your curls and with the help of other chemicals, helps retain the look for a good few months

Hair rebonding

This treatment is quite suited for people who have very curly hair and the end result is poker straight hair. In this process, the bonds of your hair are broken with the help of a chemical formula and then again neutralisers are applied to restructure the bonds. By doing this, the existing bonds that exist in curly hair are broken and once the hair is straightened, new bonds are made to rearrange the physical structure of your hair. This is a more permanent method than keratin or smoothening. However, if you love your curls, here are some tips to manage very curly, dry hair.

Hair smoothening

This process is similar to keratin but instead of keratin a different cream is used. It is best-suited for people who have wavy hair or even straight hair which is frizzy. It will smoothen out the frizz and make the hair more manageable and straight but not make it look too unnatural. People with very curly hair may not like the results as it won’t stay for too long. But if you wish to have natural-looking, straight hair which does not look artificially straightened, opt for this. The results won’t last too long unless you have very light waves or straight hair but will save you from having bad hair days. Here are some more tips to manage frizzy hair.

Anker advises to opt for either rebonding or smoothening as the re-growth in rebonding is completely natural and in case of smoothening, while it won’t make hair extremely straight, it looks more natural and does not damage hair as much.

Source: newsr


10 steps to a perfect do-it-yourself pedicure

Our feet are often the most neglected parts of the body when it comes to our beauty regime. A pedicure would not only improve the appearance of your feet and toenails it can help prevent nail diseases and disorders. You can get a pedicure at a beauty salon or simply learn the right steps to take care of your feet at home.

Step 1

Remove any existing nail polish with a mild remover.

Step 2

Put some bubble bath or Epsom salts in a tub filled with warm water and soak your feet for 10 to 15 minutes. You can also put marbles or smooth pebbles in the tub and run your feet over them for relaxation.

Step 3

Use a foot brush or a scrubber to remove the dirt lodged in between the ridges of your heels or the stains on your nails.

Step 4

Use a pumice stone or callus file and scrub the heels and bottoms of your feet to do away with dead skin cells.

Step 5

Massage and exfoliate with a foot scrub and wrap your feet in hot hand towels to seal in the moisture.

India.com
Step 6

Dry you feet with a towel and cut your nails.

Step 7

File your nails gently and push back the cuticles with orange sticks. You could also use a mild nail buffer to polish the surface of your toenails.

Step 8

Wash your feet and dry them.

Step 9

Massage each foot with a moisturising lotion for 5 minutes.

Step 10

When your feet are dry, remove any oil residue on your toe nails with remover and apply a base coat.

You’ll need: A tub or foot bath, nail polish remover, bubble bath, Epsom salts and/or scented oil, cuticle oil, exfoliating foot scrub, towels, pumice stone, callus file, nail clipper, nail file, nail buffer, moisturizing lotion, base coat and/or nail polish.

Source: inagist